Monday, December 17, 2012

Santa's Chef Picks

There's always someone on everyone's list who is impossible to buy for.  They don't really need anything, they either have no hobbies or have ridiculously expensive ones like collecting jets, or they're super picky.  If you can relate to this, I'm sorry to tell you that I have no solution to that problem.  However, I have made a list of some of my favorite things in the kitchen, so if you have any chefs or bakers you're not sure what to get, I can help you with that!  These are things I use constantly and am constantly thankful for or raving about them.  No one has paid me to recommend anything, but I thought I'd share some of my favs with you because I knew you were just dying for my recommendations.  You might even find yourself wrapping one up for yourself.  Everyone does that, right?  Happy shopping!

FlexibleGripmatS3S10
Flexible Grip Mats from Crate&Barrel

What I love most about these mats is that you get three in different colors so we designate the white one for meat only.  The boards are flexible which makes them easy to throw chopped up veggies into a pot or a bowl.  I like these so much I ended up buying a second set because my first ones were always dirty.

ParkerBowlsAVF12
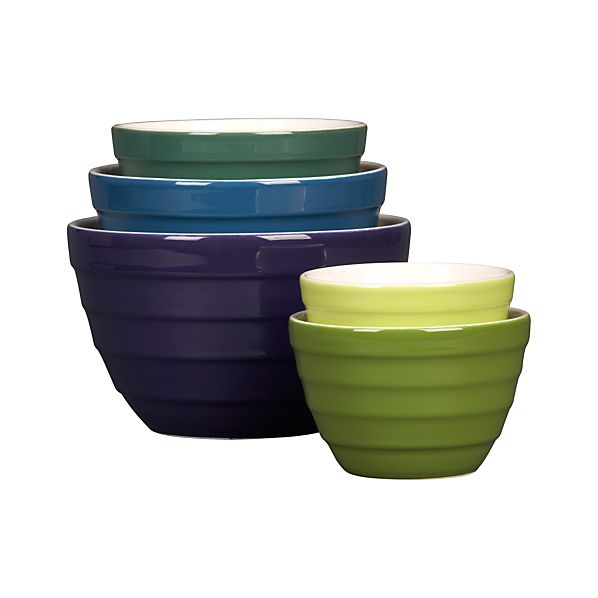
Parker Nesting Bowl Set from Crate&Barrel

I should begin with saying that I also have two sets of these bowls (I broke the big one and was heartbroken so I got another set because I used the biggest bowl so much).  The colors offered change depending on the time of year.  I love having different sizes and there's always at least one coming out of the dishwasher because I really do use them daily.

CookBookStandAlt
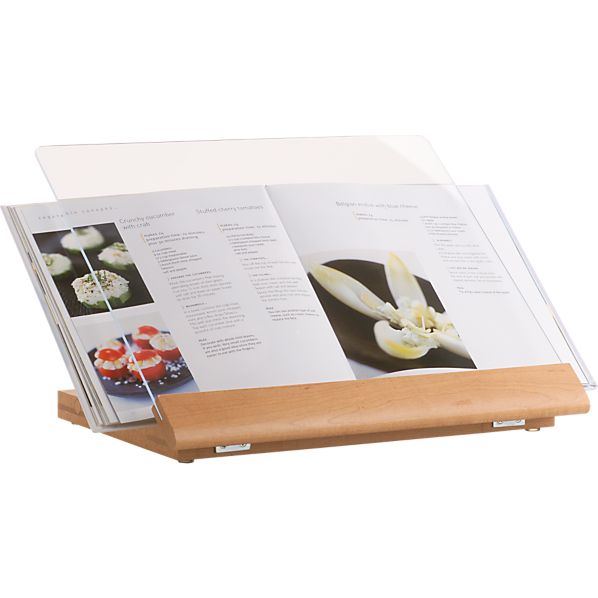
Cookbook Stand from Crate&Barrel

If you hadn't noticed, I kinda have a thing for Crate and Barrel.  I've found some unique, reasonably priced things there I love and their products seem to hold up really well, so I'm a big fan.  They also have great customer service which is a really big thing for me.  Anyhow, this was a gift from Mr. C and I never thought I'd be so happy to get a kitchen related item for Christmas.  I love cookbooks and this is perfect for using them and keeping the pages clean.  It works much better than the method I used before which involved laying the cookbook on the counter and piling cans on the corners to keep the book open.


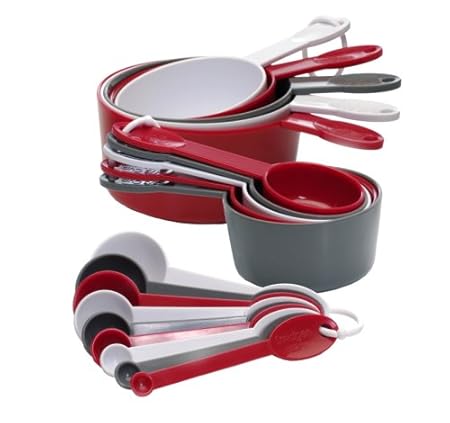
Progressive 19-Piece Measuring Cup and Spoon Set

This was also a gift from Mr. C.  When I said I wanted measuring cups I really wanted some pretty ones....you know, the ones that aren't really functional but look good.  Well, he got these instead and they are amazing.  Instead of having to use 2 measuring cups to get 1 1/4 cup I can just grab one of these.  They are BFF's with my bowls and cutting boards since they hang out in the dishwasher together so often.

Rachael Ray Tools 3-Piece Spatula Set Multiple Colors Available
Spatula set from Target
Awhile back I bought a mini spatula set from Target and I'm in love with the thing.  I couldn't find it online  but I did find this set that has multiple sizes.  I honestly believe a person can never have too many spatulas and I love the silicone ones.  I've also had great luck at finding some at Home Goods and Marshalls pretty cheap.

Chef'n Vibe Lettuce Knife

Lettuce Knife from Target
You might think a knife just for lettuce sounds stupid, but using a regular knife on your lettuce can cause it to turn brown faster.  I couldn't find one available online, but target always seems to have some available in their kitchen section.


item
Kitchen Scrub Cloth from Norwex
My wonderful friend Kari sells Norwex and after ordering some things I was hooked.  I now only use Norwex towels to clean and love the dishcloths.  They're all anti-bacterial too.  Once you get one thing you'll be sucked in though, because the stuff is so amazing!


Cookbooks are always great gifts too I think.  I have an addiction to cookbooks but the ones I pull out the most are:
Everyday Food: Fresh Flavor Fast
Eva's Kitchen: Cooking with Love for Family and Friends

Pioneer Woman Cooks: Recipes from an Accidental Country Girl
The Pioneer Woman Cooks: Food from My Frontier

Bride & Groom: First and Forever Cookbook

Good luck with your Christmas shopping!

Friday, December 14, 2012

Oh Christmas Tree


Oh my goodness.  I had half a post written and I really was going to publish it but then I had a surprise party for Mr. C. that sucked up about a month of my time, and then I was in Christmas decorating mode, and then Thanksgiving happened (yes, this is in chronological order and Christmas decorating did occur before Thanksgiving for this year only), and then I geared up for the magicalness of Black Friday, and then I took a weekend to finally clean the house and relax a bit and now here we are and you never got to read the post.  But, I wrote you a new one with Christmasy stuff so you really aren't missing out on anything.

We took advantage of my parents being in town in November and recruited them for some Christmas decorating help.  My dad and Mr. C did the outside of the house with some little lights on the trees and the big ceramic bulbs around the roofline.  it makes me so happy when I get home!  My mom and I did a lot of the inside of the house and it was so nice to decorate with her again.  I was ready to change things up a little bit this year and it was very helpful to have another decorator to try things out I hadn't thought of.  My parents had never been in town when our Christmas stuff was up so it was really nice to be able to enjoy the decorations together for a couple days.


Oh pretty Christmas tree, how we love you!  We have a very large 9 ft. tree which Oreo has claimed as his own.  He also thinks the ornaments are strategically placed toys for him.  He's finally stopped batting at ornaments so much because he's moved onto chewing on my pretty wrapping paper.  Whose idea was it to get a cat anyhow???  Oh that's right....it was mine.  And if you're wondering why we don't put the presents under the tree like normal people, it's because Oreo is training us to do what he wants and apparently it's working.


Above the TV stand is some garland and our nutcracker collection.  We bought our first one when we went to the Nutcracker ballet and it's been a tradition since.  I love how unique they all are and for some reason they don't creep me out the way some nutcrackers do.


I did a little more decorating in our bedroom this year.  I added an extra mistletoe ball over the bed and wove some garland into the headboard.  We switched out our bright pillows and white duvet cover for the thicker, green duvet we use for the winter, and I'm really love looking at the bed all made up now with the decorations.  I also hung the "Merry Christmas" garland I made last year for our photos over the bed.


The tree in our bedroom is much smaller than our main one, but I love it because it holds most of our special ornaments.  Every year I usually get at least one ornament that represents something that happened that year. I love putting the ornaments on this tree because it brings back memories and each one really is so special to me.


I decided to make a new table centerpiece this year and made this for under $15!  


The ornaments in the middle came from Target's $1 section.  I already had the glass containers from our wedding centerpieces.  I found the greenery at Michaels for $1.99 and the snowflake ornaments were .50 each.  I cut off the thin hangers on the snowflakes and used ribbon to make them various heights.  It ties in perfectly with the colors on our tree too which I’m pretty darn excited about.

I hope you have your decorations up and are ready for Christmas!  

Wednesday, November 21, 2012

Where does the time go?

Today Mr. C and I are celebrating 9 years together.  In some ways it's hard to believe it's been that long, but at the same time it's honestly impossible for me to imagine my life without him.  We've gone through so much together.  He was literally the boy next door in the dorms and once I finally realized that he wasn't hiding something and that nice guys did actually exist, we've been inseparable ever since.  He came to visit me in NE over the first Christmas break and I know my dad (and probably a bunch of other people) thought I was crazy.  Even then I knew that Mr. C filled a part of my heart that no one else could and I didn't care if I sounded crazy; I knew without a doubt he was the one for me.  Since then we've been through so much together; some of it good, and some bad, but always together.  With the busyness of everyday life it's easy to forget to tell those we love how we feel about them or how they fill our lives with joy.  Although we're married and have another anniversary we celebrate, we still celebrate the day we officially became a couple because it really is a day to celebrate and sometimes it's easy to forget how lucky we are to have found someone to share our lives with.  That's all the mushy stuff I'll post for today :)  I hope you have a wonderful thanksgiving tomorrow spent with people you love and spend some time thinking about how blessed you are, because no matter what hardships we have in our lives, we all are really blessed for some reason and have so much to be thankful for.

Saturday, November 17, 2012

She's making a list...


I blinked and it’s November already.  I hope no one tries to throw tomatoes at me for mentioning it, but Christmas is right around the corner.  I start my shopping early, sometimes picking up some things in January or March, but I kick it into high gear once November hits.  Because I’ve accumulated some gifts already and this time of year has a tendency to become a bit busy, I made myself a handy dandy excel sheet to track my gifts and today I’m sharing it with you.  Many times I buy items on sale and I like to keep track of the price paid and the actual full price of the item.  I also ship some of my gifts and trying to remember what’s been wrapped and ready to ship and what’s actually been shipped is a job in itself sometimes.   


This spreadsheet keeps it all together for me and has alleviated a bit of the stress this year. You can download the spreadsheet online here. Enjoy!

Sunday, October 28, 2012

Halloween Decor


Happy Halloween!  Well, almost.  Halloween isn’t exactly my favorite holiday.  I hate being scared and since I’m a big scaredy cat, a lot of things scare me.  I don’t like the nasty part of Halloween so I try to focus on the cute spiders (which are obviously fictional because spiders in real life scare the crap out of me), happy ghosts, pumpkins, and the colors of the holiday.  Our Disney Halloween tree sums it up perfectly.


I’m one of those people who has pinned over 200 craft projects and can count the ones I've actually done on one hand.  I can count them on half a hand actually.  I'm also one of those people who likes to start projects and not always finish them (remember how I mentioned I was still working on the last pillow for the living room?  I've been working on it for months....).  Anyhow, with that in mind I'd like to share with you the Halloween wreath I made and finished within a couple days of purchasing the supplies. It's a miracle really.

I found some inspiration online through the many fabric wreaths, some feathery ones, and a bunch with cute painted letters. I headed to Jo-Anne's with my stack of coupons and began gathering my supplies.   While doing this, Mr. C pointed to a black feather wreath that was on sale for $20 and asked if we couldn't just buy that instead.   No doubt he was worried about me buying everything and not actually using them.  I was temped to save some time and just buy the wreath but I knew I'd be happier with a homemade one.  Lucky for me I was right :)


I used an 18” wire wreath base.  I thought this would give me a fuller effect than using a foam base and in the end I think it did.  It also was cheaper and I think it’ll stand up over the years better than a foam base.

I cut a yard of black burlap into various strips using a rotary tool and cutting mat.  I had never really worked with burlap before and had no idea how horribly messy it would be.  I love the way the burlap turned out but I had little black furry things all over my arms, clothes, chair, and floor.  I had to lint roll my skin at one point it was so bad.  Based on that, I’d suggest maybe using a black fabric instead of burlap.  I really do love it, but it was quite messy and not the easiest thing to cut.  Knowing what I know now, I think I’ll be staying away from burlap for a very long time.

After tying the burlap in knots on alternating spots throughout the wire base I painted some thin wood letters orange to spell B-O-O.  When they were finished they didn’t really have the look I wanted so I covered them in orange glitter which helped them really stand out against all that black.

I tied the letters onto the wreath using a combo of black, purple, and orange ribbons I had purchased by the yard.  I also used a yard of thick black ribbon to hang the wreath (you could probably skip this but we have a very tall door).  I was able to find a sparkly purple spider at Michael’s to finish off the project.

I really love it and love that it’s unique.  And, with my coupons I came in at about $15 for the whole project.  Not too shabby.


I love seeing the wreath every time I come in the front door.


I also decked out our mantle for the holiday.  The tree was purchased from Hobby Lobby a year or two ago but I think I saw a few for sale there recently.  The spiders and bats were new this year from Pier One.  The BOO sign was made for under $5 by painting some wooden letters orange.  I finished the area off with a black and purple boa on the mantle and some cobwebs on the mirror.


Did you do any Halloween decorating this year?  I’m so excited to see the kids out Wednesday all dressed up in their costumes!

Wednesday, October 24, 2012

Taliesin West


I apologize for my lack of posting in the past few days.  I had good intentions of blogging but the weekend got away from me and this week I've just been plain lazy after work plus I've gotten sucked into this ridiculous teen book which means all other aspects of my life suffer because I want to spend every single minute reading!

This past week Mr. C had fall break so I decided to take the day off from work too so we could do something fun.   Our “date” this month (more on that in another post) was a tour of Frank Lloyd Wright’s Taliesin West.  It’s really horrible that I’ve never been there being a design student and all but people seem to not see the sights in their own states.  We headed to Scottsdale and made it just in time for the 3:00 tour.  Our tour guide was amazing; she shared lots of quotes and was a wealth of knowledge, giving the 90 minute tour with no notes.  Although I had studied FLW’s work, I really enjoyed all of the personal information given in the tour because most of it was new to me.  FLW was a creative genius but most definitely arrogant and believed his way was always the right way (perhaps because his last name was Wright?).  A few of his quotes reminded me a bit of my father actually, and a little of myself. 

We toured the outside of the house, the office, living room, bedrooms, cabaret, and the studio.  We were able to sit in each room which made the experience really great.  The guide was so descriptive in describing a typical night in the room that you could imagine yourself there among FLW and his apprentices. 

The architecture school still remains and the program sounds amazing, but definitely not anything you’d consider mainstream.  The original students lived in tents in the desert and students now construct their own living spaces in the desert while attending the school.  The original students spent part of the year in AZ and the remainder in WI and the current students do the same.  A lot of the traditions started by the Wrights continue which says a lot about the type of people they were and their passion for doing what they loved.

Here are a few of the photos I took during the tour.  Unfortunately we didn't have much time in each room so I didn't get to take a ridiculous amount of pictures.  


This is the front of the house.  The water throughout the residence comes entirely from a well.  The stones were taken from the desert and demonstrate Mr. Wright's belief that structures should work with their surroundings rather than overpowering it.  I especially love the cherokee red doors, his signature, patented color.  


The roofs were mostly made of canvas which allowed light in since there was no electricity when the house was built.  There are indoor gutters which we were told work fairly well.  It sounds like there's quite a bit of upkeep with the canvas due to the rain and desert elements.  The light and acoustics in each space was amazing.   I didn't get any photos but all the doors were built to Mr. Wright's height of 5'8".  He apparently thought that anyone over 6" was a waste of space.  Woohoo for Mr. C and I; we made it under the cut!


Mr. C in one of the origami chairs.  The chairs were designed for the sitter to position themselves a certain way which promoted a relaxed and open body language.


Apparently the glass windows were an addition added after a few years due to the persistence of Mrs. Wright.  Previously there were canvas panels and the spaces had to be cleaned out each fall when the Wrights and apprentices returned.  And I thought cleaning my house was a pain....

  
I actually love this long seating area.  I don't think we've ever had enough people to fill this in our house at once though :)


FLW's room including his small desk and library.  The tour guide explained that there were two beds; one for sleeping and one in which Mr. Wright thought up many of his brilliant designs.


The residence was designed to work with the sun, heat, and desert surroundings.  This was a picture taken from a courtyard that was surprisingly cool due to the design of the structures around it.


I'm so glad we finally made it to Taliesin West.  I was most definitely worth the wait.  If you live in the Phoenix area and haven't visited, I definitely recommend it!

Monday, October 15, 2012

Living Room Update, Part 2


I’d like to begin this post by saying I am not a professional photographer (shocking, right?).  We’ve had our camera for at least a year and I still really have no clue what I’m doing, but I’m working on it.  You know when your friend is trying to show you pictures of the cute guy she likes and after each picture she shows you, she says, “he really is cute, let me find a better picture”.  Well, that’s how my living room pictures are.  It really does look good in person (or so I think), and the photos just don’t do it justice.
Now that that’s out of the way lets get back to the living room update.  I have been getting hassled today to post the update (maybe hassled is a strong word….how about harassed?  No that’s not good either….).  I'm so excited you have all been so excited, and I really do appreciate every single one of my wonderful readers!
To determine what needed to be fixed and where to spend my money, I sat down and decided exactly what it was I (we) didn’t like about the living room and came up with these items:

  • Dark colors, specifically the prevalence of green EVERYWHERE
  • Lack of our personality in the space
  • Matchyness of it all
  • The accessories weren’t working for us – for example the candle holders on the DVD stand were always dirty and I hated moving them to dust
  • Nothing was really very personal feeling
  • Stuffing in the throw pillows had bunched up

 Then I determined my goals for the room:

  • I needed to work with what I had and spend as little money as possible. Getting a new couch wasn’t an option and definitely wasn’t needed.  I knew that DIY projects were the key to keeping this project feasible.
  • I wanted to brighten it up with accent colors and identified turquoise as a major color for the room
  • I wanted to address the wall around the fireplace and give it a purpose.
  • I wanted the space to be deliberate and functional
  • The flat, bunchy pillows needed to be replaced with something that was unique, functional and would provide pops of color.
I used those lists to decide what I wanted to spend my small budget on.

  • Pillows
  • Area rug to tie everything together
  • Shelf or mantle above the fireplace
  • Mirror above the shelf/mantle to brighten the space and create dimension

After finding my inspiration pillow online I headed to Pier One to purchase it.  I removed the old brown and crème throw pillows and was amazed at how much of a difference the one pillow made!

I started scouring Etsy and Pinterest for other pillows and found a lot I liked.  Unfortunately they were all pretty pricey too.  I have a sewing machine but we had a falling out a couple years ago.  However, I was inspired by a bunch of pillows online and figured I could make them myself.  Luckily my mother-in-law was able to reconcile my sewing machine and I and get me started.  I was lucky enough to find a flier of coupons to JoAnne’s and purchased my pillow forms and fabric all at half off.  I ended up spending about $100 for the five pillow forms, fabric, and miscellaneous sewing supplies.  I picked different colors of linen for the pillow base and added felt.  I love how they turned out and the pop of color!  I also purchased one additional ruffled turquoise pillow from Pier One to tie the homemade with the handmade feel.  I should mention that only 3 of the pillows I made live in the living room.  One has a home in the guest room and the last one has been in progress for a couple months…either way 5 pillows for $100 was much better than paying $60 for one.


I also spotted a turquoise lamp at Pier One and snagged that for $35 after using a coupon during a sale.  In addition to being a splash of color, it’s so nice to have the warm light of the lamp instead of the harsh light from the ceiling. 


I also needed to address the wall around the fireplace.  I knew the clock needed to move.  It was too small for the wall and although I love it, it wasn’t adding that much to the room.  We ended up moving the clock to another wall more proportionate to the clock.  I should mention that the shelves aren’t usually that “cluttered” but the house is currently all decked out for fall.

I wanted desperately to put a shelf above the mantle but finding a shelf that long was difficult and much more expensive than I anticipated.  We were able to just find the unfinished mantle shelf which I finished and Mr. C mounted (more on that later).  An amazing family member gave us the mirror, and it really makes the room.  The mirror brightens up the room with the reflection of the light and I really love being able to display holiday or seasonal decorations on the mantle.

If you didn’t notice, the TV had stuck out before with its metallic silver color.  We loved the TV and had no plans to replace it.  Apparently the TV had other plans though and decided to go out in the middle of a very riveting “Private Practice”.  We ended up finding a great deal and I have to admit I love how the TV now blends into the cabinet (looks better in person I promise!).  Apparently even the TV agreed that it was time for a change!
I also moved some things out of the room that weren't being used (dog bed, a few photos that didn't really fit) and organized the drawers and cabinets in the entertainment center, and added a basket under the coffee table to store magazines among other things.  The space feels much more functional and every drawer really does have a purpose now!
I did waste a substantial part of my life searching for a rug for the space but I couldn't find one I was happy with.  They were either the wrong color, too busy, or too plain.  In the end I fell in love with the space after making the other changes and I thought a rug would be too busy. Also, I ran out of money.  Ha ha!


That’s the update!  What do you think?  In case you can’t tell I’m ecstatic about the changes.  The space feels comfortable, complete, and very “us”.  The pops of color just make me so happy too!  I’m still working on something for the coffee table but for now it’s housing our jack-o-lantern.

Sunday, October 14, 2012

Living Room Update, Part 1


No matter what my job is, I will always be a design student.   I will always be passionate about color and light and making spaces both aesthetically pleasing as well as functional.  No matter what my job title, I will always be a designer at heart.  I love looking in other people's houses to see what they've done with the space and really enjoy helping them make updates as their visions change.  I love helping people see what small changes can do for their space.  I strongly believe that the spaces we surround ourselves with have a direct impact on our moods and therefore our lives.  For me a tidy space with beautiful colors, varying textures, and natural light is everything.  Here's the problem: take me to someone else's house and I'm all over helping them, but at my own home I’m a bit challenged.

As we've moved I've gradually made changes; different paint colors, changing the pictures on the walls, moving rugs around between rooms, and updating “college” décor for something a bit more sophisticated.  One day I was sitting in our living room and realized that it didn’t really make me happy.  The room had consisted of the same colors for the past five years at least.  This wouldn’t be so bad except for the fact that I never really liked the living room colors to begin with.  You’re probably wondering why I used colors I wasn’t in love with in the first place.  Allow me to explain.

We got our couch a few years ago and it’s worked perfectly for us.  I fell in love with the chaise lounge (it was a requirement for the couch to have one) and it’s super comfy.  At the time I had my heart set on a white couch but people told me I was nuts and it would get dirty (I do agree now).  We got a great deal though so this grayish green won out in the end.  I began building our living room around the couch.  I added some neutral pillows in different textures and we found a rug that tied the wood furniture and green couch together.  Everything matched and I thought that was fine, however I eventually began to feel like it was TOO matchy matchy. It also seemed like everything I looked at was green.  Perhaps that's because it was.  It didn’t feel like “ours” but rather like something plucked from a catalog - a matchy catalog from a chain store to be exact.

The space is called a “living room” for a reason; we spend a lot of time in there.   As I mentioned before I really believe that a space directly affects our moods, so after some assessment I decided it was time to update the space a couple months ago.  The big items would stay and I’d focus on using accents to transform the room into a space that reflected our personalities, fit the way we live, and most importantly would give us a space we LOVED.

Here’s the before pictures (sorry about the weird angles/lighting).  It’s so blah, right?  The more I look at it the more I dislike it and think, “what the heck was I thinking???”


I began scouring pinterest for color inspiration.  The color of the couch wasn’t exactly the easiest to work with.  I found sites with instructions for making slipcovers and perused color boards but nothing really stood out.  Finally I realized that I seemed to be zeroing in on turquoise things so I knew I needed to work this into the décor.  While on the Pier One website I found the pillow that changed my life.  Okay, it changed my living room, but that’s a huge thing!  I loved the colors in the pillow and was excited to see that it perfectly tied in turquoise and the dark greenish/gray shade of our couch.  Happy dance!

Here's the pillow that started it all and became the inspiration for the change.  


That’s all you get today though!  Tomorrow I’ll post the big reveal!

Wednesday, October 10, 2012

Addictive Pumpkin Cookies

I’d like to apologize in advance for sharing this recipe with you.  These cookies are easy to make and they are amazing.  You may be wondering why I’m apologizing then.  When I say these cookies are “amazing”, I mean that they’re so good that it’s actually impossible to eat just one.  Or two…  They are sweet, have the consistency of cake, taste like fall, and are ridiculously addictive.  So, I’m sorry.  But if you’re like me you can bake up a bunch and find someone (or a lot of someone’s) to share them with so you don’t eat them all yourself. 


Mr. C likes to laugh at me because I tell him that I “fix” recipes.  It’s almost a daily occurrence in our house.  It’s not that they weren’t good to begin with, but I like to put my own spin on things when possible, add some extra flavor and I call this “fixing” it.  That’s just what happened with these delicious cookies.  I made the recipe as directed and then tried again, adjusting some things until I was satisfied.  And then I fell in love with them.  I hope you enjoy!

Addictive Pumpkin Cookies
Adapted from : Better Homes and Gardens
*yields about 50-60 cookies if you make them a realistic-sized and not the crazy “bite-sized” that just makes you eat twice as many

Cookie Ingredients
2 c. butter, softened (I throw mine in the microwave for 20 seconds or so to soften it up)
2. c. sugar
2 tsp. baking soda
2 tsp. baking powder
2 tsp. cinnamon
1 tsp. nutmeg
1/2 tsp. cloves
2 tsp. vanilla
2 eggs
2 c. fresh pumpkin or a 15 oz can (I really suggest fresh though)
4 c. flour


Beat butter in electric mixer on medium speed for 30 seconds.  Add sugar, baking powder, baking soda, cinnamon, nutmeg, cloves, and mix until blended.  Add in eggs and vanilla and mix.  Beat in flour 1 c. at a time, stirring in between. 


Preheat oven to 350 degrees.  Drop dough by heaping tablespoons on a cookie sheet.  Bake 10-12 minutes; tops will be set when done.  Transfer to wire rack and cool.

Frosting Ingredients
½ c. butter
¾ c. brown sugar, packed
¼ c. milk
1 ½ tsp. vanilla
3 ½ c. powdered sugar
Cinnamon for sprinkling on top


In small saucepan, heat butter and brown sugar until melted and smooth.  Transfer to a bowl and stir in milk and vanilla.  Beat in powdered sugar for several minutes.  Mixture will thicken but will be the consistency of a thin frosting.  

Spread frosting on cooled cookies and sprinkle with cinnamon. 


Enjoy the cookies and remember that you were warned...


Tuesday, October 9, 2012

Alzheimer's Walk

In between recipes and crafty posts I'm hitting you up to consider contributing to a wonderful cause.  Mr. C and I (and maybe Coconut) are participating in the Walk to End Alzheimer's on November 3rd in Phoenix.  We decided not to try to put a team together, but if you are interested and live close we'd love it if you'd walk with us!  It's a 3 mile walk, or a 1 mile shortcut, and it begins at 9 am   If you're interested in donating, that would be greatly appreciated as well!  The money raised goes towards the Alzheimer's Association and is used for care, support, and research.  I'm used to doing Relay for Life so a 3 mile walk that doesn't require me to stay awake all night sounds like a great idea!  More info about the walk and a link to donate is available online here .  Thank you for your consideration!

Monday, October 8, 2012

Simple Pumpkin Seeds


Here’s the promised pumpkin seed toasting post.  These are super easy and super addictive.

You’ll need to first separate your seeds from the stringy pulp.  I use my fingers to pick them out, then put in a strainer and wash well.  Let the seeds dry for about 30 minutes or so. 


You can prepare these a bunch of different ways using spices such as melted butter and cinnamon, cayenne pepper, seasoning salt, garlic salt, or just salt and pepper.  There are so many recipes out there, especially all over pinterest.  You can even soak your seeds in apple cider before toasting them for a fallish taste.  I won't even pretend to know the billions of ways to cook pumpkin seeds.  Personally, I like to keep mine very simple and just lightly toss in olive oil and sprinkle with salt and pepper.  I don’t use salt on much of anything but I don’t think the seeds taste as good without it.  

I mix everything up directly on the cookie sheet so I don’t waste getting a bowl dirty.  Lightly drizzle the olive oil and toss the seeds.  You can add more later if you need it but it’s better to start with less.  Once you’re happy with that, sprinkle on salt and pepper and toss well to coat.
Cover a baking sheet in foil or parchment paper and lay the seeds out flat.  I reused my “foil bra” from baking the pumpkin to line the cookie sheet.  Reuse and recycle people!


Bake at 300 degrees for about 20-40 minutes, stirring every 10 minutes.  You’ll want to watch the seeds closely to make sure they don’t burn.  My cooking time seems to vary each time I make them so the key is checking them often to make sure they aren’t over-toasted, otherwise known as burnt to a crisp.  Those aren’t so tasty.  It may be common sense to set a timer for 10 minutes instead of setting the timer for 30 and assuming you’ll remember to check the seeds, but I’m going to just mention it in here for anyone who may have a brain that works like mine.  If I set the timer for 30 minutes I tend to get sidetracked and then remember to check the seeds when there’s about 2 minutes left.  I advise you to learn from my mistake and just set the timer for 10 minutes at a time.

I'm assuming that after reading this post you've all baked up some pumpkins, have exhausted making pancakes, bread, pies, and are looking for something new and exciting, right? If so then you're in luck because later this week I'll be sharing one of my new favorite fall recipes which just happens to put that fresh pumpkin to work.

Saturday, October 6, 2012

Fresh Pumpkin


In case I haven’t reminded you enough, I’ll remind you again that I absolutely love this time of year.  Fall in Arizona is a little different than fall in Nebraska where seasons are pretty definite, but I still love it; the smells, the deep oranges and reds, the cool weather, the delicious foods, and the pumpkins!   Pumpkins have begun popping up in stores during the past few weeks and last weekend I decided to buy a few baking pumpkins.  Then I bought a few for decorating the porch…and then we saw a HUGE one at Sam’s club that was reasonably priced so now my house is full of pumpkins!  I think I have a pumpkin addiction.

I love making pumpkin goodies and I’m always on the lookout for new things.  For the longest time I only knew of the pumpkin that came out of a can to make these wonderful concoctions, however last year I took the leap and tried using fresh pumpkin.  I haven’t gone back to the canned stuff since.  It takes a little time, but I promise you it’s worth it, and you’ll save some money too since those little baking pumpkins are cheaper than the canned stuff (unless you shop at Whole Foods, because they were selling the baking pumpkins for around $12!). 

When you choose your pumpkin you’ll want to select one between 2 and 4 lbs.  Any bigger than 5 lbs. and the pulp becomes too stringy and the outcome isn't as good.  Because of this, I only use the baking pumpkins


You’ll need your pumpkin(s), a cutting board, sharp knife, baking sheet, spoon, and an oven.  If you don’t have an oven I can’t help you, although I have been told you can also do this in a crockpot.

VERY CAREFULLY, cut your pumpkin in half.  


You can remove the stem if you want; I have before but these stems didn't want to come off so I just left them.  Inside you have that wonderful stringy, seedy goodness.  Baked pumpkin seeds are amazing and I’ll share how I bake those with you tomorrow (spoiler alert: it’s crazy easy).  If you plan to bake the seeds you’ll need to separate the seeds from the pulp.   Scoop out all the stringy innards.  I used a combo of a metal tablespoon and a knife to cut the tough spots. 


Line a baking sheet with parchment paper or foil.  You are welcome to skip this step, but if you’re lazy like me you’ll be happy later that you just need to throw the foil away instead of having to scrub the leftovers off your pan.  You’re welcome.

Place your pumpkin cut side down on the foil.  I have no idea where I picked up this next part or if it’s even necessary, but then I cover the pumpkins in foil.  It makes me laugh every time.  It’s like making foil snowmen or something.  Or a foil bra.  Either way it’s funny stuff.


Bake at 350 degrees between 45 minutes to an hour and a half, depending on the size of your pumpkins and how many you threw in the oven.  Your pumpkins are done when they are tender inside.  You’ll be scraping the pulp out so if it’s not tender enough to scrape out, then it’s not done yet.

Let the pumpkins cool and scrape out the insides.  You’ll be left with a thin shell.  I've heard of people pureeing the pulp so it looks more like the canned stuff, but I never have and I've never heard any complaints about my pumpkin goodies.


I hope you try fresh pumpkin this year if you haven’t already jumped on that bandwagon!  It’s so worth it and as I mentioned, I’ll post how I bake the seeds tomorrow so it’s really a 2 for 1 deal since you get seeds and baked pumpkin, and it's CRAZY easy!